
Crafts using Sharpies are very popular on Pinterest because they are very easy to make. Also, Sharpie pens are not hard to find and are affordable, unlike some craft supplies that are as rare as a double rainbow.
Speaking of rainbows, Sharpies come in a wide variety of colors (and variants) which is why they are a crafters’ go-to item most of the time.
Crafts using Sharpies come in different shapes and forms. They can be simple, and meticulous.
Using sharpies, your plain gift wrappers can be transformed into a fancy paper people will want to keep. Really, the possibilities are endless.
Some people even use Sharpies to tie-dye their shirts. If you’re asking why don’t they just stick to the traditional method of tie-dyeing, it’s because this is used for designs that don’t require the whole shirt to be dyed.
People also use Sharpies to beautify their walls, with the help of rulers and painter’s tape to create geometric patterns.
Still not impressed? These three crafts using Sharpies will surely get you there. (If not, maybe you’re hard to please or just in the denial phase!)
Crafts with Sharpies # 1: Stained Glass 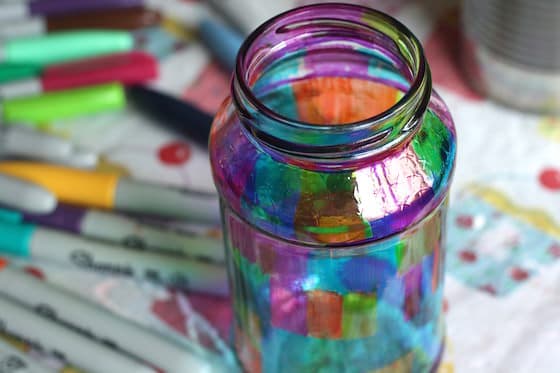 http://happyhooligans.ca/stained-glass-with-sharpie-markers-and-a-jar/
For this project, you can use mason jars even any glass containers or glass pane.
The instructions for this craft is easy: Just draw on the surface of the glass with your chosen colors. You can do any pattern or image you want.
Remember to use single strokes only as a second tend to lift the first. Also be careful not to overlap colors. This will make the colors mix.
You also don’t want a smear of another color on the tip of your Sharpie pen.
If you want an authentic stained glass feel with all those black metal separators, you can achieve this effect by doing either of the following:
Draw the outline or separators using a black Sharpie pen. Other alternatives to using a black sharpie:
- Use black paint, but make sure there are no visible brushstrokes.
- Apply hot glue on the outlines and carefully coat it with black paint.
A stained glass mason jar or any container will be perfect as a luminary, candle holder, or sun catcher.
Crafts with Sharpies #2: Iridescent Bulb  http://nodontpinthat.blogspot.com/2014/04/draw-on-lightbulb-with-sharpie.html
For this project, make sure that you’ll be using a bulb with transparent glass.
Use different color sharpies to doodle the surface of the bulb. Be care when doing this as bulbs have a thin surface (you don’t say!).
Also, remember to not hold the part you just drew on. It’s still wet!
The result will be like the one above. It’ll be like you are in a fantastical fairyland. The light goes through the stained bulb light thus producing different colors to go with the white or yellow light.
You may also use a black sharpie to draw patterns on any kind of bulb. This will not result in a fairyland kind of lighting, but the pattern will appear on the walls of your room.
If you are having second thoughts about these light bulb crafts using Sharpies, you should try making a stained “glass” luminary first.
This can be done by drawing stained glass pattern on acetate or wax paper. Roll any of these into a cylinder, mount in a sturdy base and use it to cover a light bulb. (You can also use candle, but it will be risky.)
Read about Crafts using Sharpie involving porcelain here.